Monday, October 28, 2013

Halloween Makeup - Living Dead Girl Zombie Look

Halloween is my favorite time of year. You can go all out on crazy makeup!
Here's a look I recently did, I was inspired by Petrilude on YouTube. He's always been my favorite YouTuber because he is so creative & amazing! (I posted his picture below for reference).
I used liquid latex & tissues to build the wound area. I did one layer on the outer perimeter, then built it up closer to my eye area so that I could get the effect of the skin being pulled off or ripped open. The smaller wounds are just liquid latex.
After all of the tissue/latex dried, I used a heavy concealer & foundation all over. I took a sponge that I got with Halloween makeup to stipple, some green, yellow & black on my skin. I then put the foundation on top & blended it out a bit. I wanted it to look like something was going on under my skin. I used a powder much lighter than my skin tone to blend everything together.  You want to make sure that the latex & tissue area blends really well with your skin. Next I peeled the latex area back, you can form it to however your little heart desires!
I started contouring the parts of my face where I wanted it to look sunken in. Mainly around my eyes, nose, cheekbones & lips. I used Wet n Wild Color Icon I Heart Matte Eyeshadow Palette to contour, I mixed the dark brown burgundy color with purple & green and added depth with black. I also applied the white to my face to help make me look extra pale!
 I painted (with Mehron Bruise Wheel) the inside (where the latex is lifted) to black so that it would have depth & look like a deep wound. Then, around the inside a with dark burgundy color. I applied Mehron Coagulated Blood Gel & fake blood. I also took tweezers & pulled the smaller areas of latex apart and applied fake blood.
You can watch Petrilude's video here, it's easier to see it than have someone explain it!
(Picture Courtesy of Google Images)
I hope you enjoyed this look!
*Krystle


Saturday, October 26, 2013

Halloween Look - Glasgow/Chelsea Smile (WARNING:GRAPHIC!)


Hi!
So I am venturing out into SFX makeup & I have been doing a lot of playing around! I have done a few looks that I will be sharing over the next few days.
The first look I will be sharing with you has a few different names, it is most commonly referred to as the Glasgow Smile, Chelsea Smile or Joker Smile.
Definition from Wikipedia:
A Glasgow smile (also known as a Glasgow, Chelsea, or Cheshire grin) is a wound caused by making small cuts on the corners of a victim's mouth, then beating or stabbing him/her until the muscles in the face contract, causing the cuts to extend up the cheeks to the victim's ears. This leaves a scar in the shape of a smile, hence the name.
 My brother bought me Ben Nye Nose/Scar Wax a few years ago for Christmas because I was planning on getting into FX makeup, however, I got side tracked & never got to play around. So fast forward to a few weeks ago, I started debating what I should do for Halloween. I started researching when a picture of the Chelsea Smile popped up. I was instantly in love with the detail & I knew I had to give it a try.
 I started with scar wax & molded it to about 3" long. I didn't know I should use Spirit Gum, so I didn't have that available (which would have made this much easier!). But I applied that to the side of my mouth, I worked one side at a time. I used a metal spatula to help mold the scar wax as close to my skin & make it blend. The wax is very sticky so I kept my hands coated with Vaseline to keep it from sticking to them. I applied 2-3 coats of liquid latex, allowing each coat to dry in between.
You want to be VERY careful with the next step, I took a pair of small scissors & starting making small snips at the wax/latex. I wanted it to looked jagged & ripped, not be a clean cut line. I also took a little latex on my fingers & bunched it together to look like the skin was torn.
I used Mehron Master Bruise Wheel for the color. I used a deep burgundy color all over the wound & black under the flaps. This will create depth and dimension. I used a small paintbrush from a craft store for the application. I applied Mehron Coagulated Blood on a small brush all over the open area, this is almost like a gel & gives the illusion of a cut before it has scabbed over. Then, I applied fake blood that I got at a Halloween store. I used a sponge & stippling motion to make it appear more real. *Make sure that wherever you apply the latex does not have any hair, it will rip it out & it hurts!
I hope you like this look!
Krystle
 

Saturday, October 12, 2013

MAC Hue Lipstick Review & Swatches

Happy October!
Can you believe I haven't posted since July? My sincerest apologies, my life has been upside down the last few months. I feel that I should explain about what exactly is going on. My parent's just got divorced after 37 years of marriage. As you can imagine, this was quite hard for me to handle & I have been trying to deal with it as best as possible. On top of that, my husband & I decided that we were going to move in with my father to help him adjust & so that we can save some money to purchase a house in the near future. More or less, I moved in to help my Dad through this difficult time & maybe help myself cope a little bit as well. So again, I apologize for being gone so long but I am finally feeling like myself again & ready to get back to blogging!
I'm going to do a review on my favorite MAC lipstick, Hue. I absolutely love this color & it has become my go to lipstick. I used to always use Myth but I would have to layer a pink toned gloss over top because Myth is super nude, alone it can really wash my skin out.
I started searching for a pink toned lipstick that I could use in place of Myth, just to try something different. After doing a ton of research, I stumbled upon Hue. MAC describes Hue as a soft pale pink & it is a Glaze. My personal opinion about MAC Glazes is that they are sheerer than most other MAC finishes & are almost like a gloss. They are not drying at all & I tend to use them more often than most other MAC finishes.
I like to use NYX's Slim Lip Liner in Rose (my favorite!) all over my lips & apply Hue on top. The liner is a lighter matte pink & Hue adds a bit of shine.
Here is Hue in comparison to a few other MAC lipsticks.
Hue (Glaze), Myth (Satin), Please Me (Matte) & Snob (Satin)
Here is Hue on my lips. Again, I usually use a matte lip liner first, I feel like Hue is almost too light & glossy for me to wear alone. But it does look alright alone, I would use it if I was in a hurry & needed some color on lips.
All in all, I love MAC Hue, I find myself using this very often.
I hope you have enjoyed this review!
All the best,

Monday, July 1, 2013

MAC Bronze, Tempting & Contrast Pin Up Look

Hello Followers!
I am sorry that I have been MIA lately, I've been very busy doing wedding makeup & working.
This is from a few weeks ago, I was doing makeup for a photo shoot & playing photographer assistant for the day. I'll post a few pictures of the model when I get the pictures back.
I used UDPP as a primer, I applied MAC All That Glitters to my eyelid. I used MAC Tempting on my crease & MAC Bronze on the outer corner. 
For me, a pin up look is based on the eyeliner. I like to do a very precise cat eye with liquid liner, usually black or dark brown. It took me years to figure out how to work with liquid eyeliner, I started by using gel liner & a very small angled brush & then worked my way towards using liquid liner.
A better view of the eyeliner. This is Maybelline Lash Stiletto Liquid Eyeliner in Blackest Black. Hands down, my favorite eyeliner, I just wish it was waterproof! I do not use tape ( I get this question all the time). I draw a straight, thin line across my eyelid, then wing it out on the corner. I connect the two lines and fill in the rest.
I used MAC Contrast under my lower lash line. I always us MAC Fluidline first, in either Blacktrack or Dipdown then set it with an eyeshadow color. If it's a warm color, I use Dipdown (brown) if it's a cool color, I use Blacktrack (black). 
Here's how I wore my hair. This was REALLY easy, my hair was already wavy from the previous day. I took my bangs & twisted them to get a bump or poof, then I bobby pinned that section. Next, I took a teasing brush & combed my sides as slick as possible. My hair is very thick so I used a clip to help keep the pony tail high. I also teased it to get some volume. Next, I sprayed it with a very strong hold hair spray and tied the bandanna in.  I got so many compliments & it took me less than 10 minutes!
Thanks for reading & have a great night! 
Krystle

Wednesday, June 12, 2013

Glamour Doll Eyes Vigilante & Recruit

Hi!
I hope you are having a great Wednesday! 
I decided to play with a few of my Glamour Doll Eyes (GDE) shadows. I have so many eye shadows by them & I rarely play with them because I find loose powder/pigments harder to work with. I am not gifted with loose shadows!  
Here's a look that I created:
FACE:

  Urban Decay Pore Perfecting Complexion Primer Potion

MAC Studio Fix Finish Plus in NC40
MAC Studio Finish Concealer in NC20
MAC Gingerly
EYEBROWS:
ELF Studio Eyebrow Kit in Medium
MAC Cork 
 EYES:
Urban Decay Primer Potion
Fyrinnae Pixie Epoxy (A MUST HAVE FOR LOOSE EYE SHADOWS!!)
GDE Recruit (eyelid)
GDE Vigilante (outer corner & crease)
MAC Shroom (highlight)
MAC Blacktrack Fluidline (upper/lower lashline)
NYX Slim Pencil in Pearl White (lower waterline)
Maybelline Turbl Lash in Blackest Black (waterproof)
LIPS:
NYX Slim Lip Liner in Rose
MAC Hue Lipstick
 Vigilante:
(I got this as part of the Super Shadows Collection)
GDE Says:

Vigilante is a darkened blue with black undertones and a silver sparkle throughout. You know that chill you get down your spine when you're doing something you shouldn't be in the dead of night? Chances are that's Batman breathing down your neck. Bruce Wayne may not have superhuman powers, but he most certainly holds the title for most-feared crime fighter.

Full Jar (No Sifter): 2-2.5 grams of product in a 5 gram jar.
Full Jar (With Sifter): 1.5-2 grams of product in a 5 gram jar.
Ingredients: Mica, Titanium Dioxide, FD&C Blue #1 Aluminum Lake, Hydrogenated Polybutene, Iron Oxide, Magnesium Stearate, Tin Oxide.
Approved For: eyes, face & nails. 

Full Size is $6.
Sample Jar is $2.50.
Sample Bag is $1.25.
Recruit: 
(I got this as part of the Super Shadows Collection too!)
GDE Says:
Recruit is a rich teal with silver sparkles throughout. If anyone has been around the block, it's James Howlett (or as he calls himself these days, Logan). From wars to Weapon-X, Wolverine has seen it all. I'd stay on his good side if I were you; he's got a wicked temper. Oh, and did I mention he's slightly indestructible? 
Full Jar (No Sifter): 2-2.5 grams of product in a 5 gram jar.
Full Jar (With Sifter): 1.5-2 grams of product in a 5 gram jar.
Ingredients: Mica, Titanium Dioxide, Yellow #5, Blue #1, Hydrogenated Polyisobutene, Palmitic Acid, Aluminum Powder, Silicon Dioxide.
Approved For: eyes, face & nails. 
 Full Size is $6.
Sample Jar is $2.50.
Sample Bag is $1.25.
All in all, I really love both of these colors. I wish I would have had a little more time for blending but I was already running late. One thing I have learned with loose shadows in to pat them on as opposed to rubbing them in. The Pixie Epoxy is also a must have for shimmery/sparkly shadows. It is a tacky base that makes the colors pop! You can read a little bit more about the Pixie Epoxy here.
Thanks for reading!
Krystle

Saturday, June 8, 2013

MAC Blue Brown Pigment Swatches & Dupes


Today, I will be reviewing/swatching MAC Blue Brown pigment. 
The Basics:
Pigment is a highly concentrated loose colour powder that contains ingredients to help it adhere to the skin. Create a subtle wash of colour or an intense effect. Does not streak or cake. Easy to blend and long-lasting. Please note: Pigments are sold by weight not volume. Containers can appear to be less than full due to settling of the products.
MAC describes Blue Brown pigment as a brown w/ blue/green pearl (Frost). Pigments come in 4.5 grams/.28 oz for $21.00 on MAC's website (discounts for Pro members). 
The container comes with a twist off lid & a sifter. It can be quite messy to work with & I had fallout all over my vanity table!
I have had my eye on this pigment for a few months but I have so many mineral eye shadows & other loose eye shadows that I rarely use. Once I googled the images, I was sold. This color is amazing. They offer so many different pigments that it's hard to make a decision. I have MAC Club & I love that color, this is a brighter bolder MAC Club.  
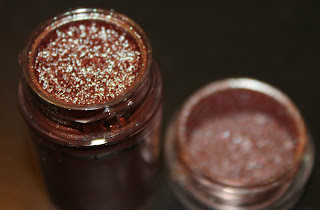
It's so hard to get this color to photograph right. This color is a duochrome, so in the container  it is a reddish brown (like show above) but when the light hits is a certain way it reflects a green/teal color. I personally love duochromes because you can completely change the color with different primers & bases. It's like getting two eye shadows in one!
(Look at this color!)
I have quite a few colors that are close but still very unique. I purchased Glamour Doll Eyes (GDE) Dino Spotz quite some time ago but it became a favorite very quickly. They do look completely different in the container. I feel as though GDE Dino Spotz is a finer consistency, however, when applied it isn't as bold.
Next is Wet N Wild's "Comfort Zone" Palette's definer. This is the right side's definer & as soon as I saw this color I loved it. Again, this is a dupe for MAC Club, which is the eye shadow version of MAC's Blue Brown pigment. It have that same chocolate/reddish base with the teal shimmer.
This is MAC's Club. You can see that this color and Wet N Wild's definer color are so close. 
Onward to the swatches!
This is just MAC's Blue Brown Pigment swatches with different primers.
(From left to right)
1. No Primer
2. Fyrinnae's Pixie Epoxy (AMAZING!)
3. Urban Decy Primer Potion
4. Foiled with BFTE's Mix & Seal
Obviously, Pixie Epoxy makes this color look gorgeous. 
Fyrinnae's description of Pixie Epoxy:
The original! A must-have for shimmery, sparkling shadows! This is not an eye shadow primer, or really a base. It is to keep sparkles on and/or to make shimmery shadows appear "glossy": a foiled look without foiling. 
Originally developed and formulated in 2007, this unique "glue" is designed to hold the sparkliest, most shimmery eye shadows in place, minimize "fallout", and also to easily create a foiled look without foiling. Don't worry, it's easily washed off, and while keeps shadows in a water-resistant state, the product itself is water-soluble (no silicones or oils).

Here are the swatches of the Dupes:
(Front left to right)
1. MAC Blue Brown Pigment (no primer or base)
2. GDE Dino Spotz (no primer or base)
3. GDE Dino Spotz foiled with BFTE's Mix & seal
4. WW Definer from "Comfort  Zone" palette (no primer or base)
5. MAC Club (no primer or base)
Even though each color is close, they are still very different. GDE Dino Spotz is really close when foiled but still more red, less bold & when dry does not show as much teal. The WW definer is closer than MAC Club. In all honesty, Club doesn't really compare. It deosn't pull the teal tone unless foiled, it's closer to a red brown when applied dry.  
All in all, I love this pigment. I'm hoping to play with it later this evening & get a look to show you!
Thanks for stopping by! 
*Krystle

Thursday, June 6, 2013

HUGE MAC HAUL

Hi!
I hope you guys are having a fantastic Thursday!
This haul is from last week, I have done 3 weddings in 3 weeks & I always try to put 25% of my earning back into my makeup kit. So, I hit MAC's online store for some basic eye shadows and a few other things. 
So I ended up purchasing:
 Blue Brown Pigment
Mineralized Skinfinish Natural in Medium Plus
Melba Blush
Lipstick in Hue (my new favorite!)
Eye shadows in the following colors:
Carbon
Espresso
Bronze
Guacamole
Cork
Satellite Dreams
Swiss Chocolate
Nocturnelle 
Naked Lunch
I also purchased a Fluidline in Dipdown.
Here's a look I did using some of the new products. I used Bronze on my eyelid, Naked Lunch on my brow bone & inner corner. I used Dipdown on my lower lash line & topped it with Guacamole. I also used the Mineralized Skinfinish Natural in Medium Plus & Melba blush.
I love Guacamole. It's such a gorgeous teal colored green, perfect for just a pop of color. 
I'm also very excited to announce that I became an aunt on 5/23 for the fist time! My brother in law & sister in law welcomed a healthy baby boy, 8 pounds 1 oz & 20.5 inches long. His name is Dane Lee & I could not be more excited! This is his big sister & him 3 days after he was born. (Please forgive my makeup less face, I slept late & had NO time!)
Have a great day!
*Krystle

Friday, May 24, 2013

MAC Woodwinked, Sumptuous Olive, Shroom & Humid LOTD

Happy Friday Followers!
I feel like it's been such a long time since I posted an actual look & not swatches, so here is today's look!
For this look, I used MAC Woodwinked on my eyelid, Sumptuous Olive in the crease, Humid on my lower lash line & Shroom as a highlight on my brow bone  Sumptuous Olive is one of my favorite colors & I think it really brings out the green in my eyes. 
I filled my eyebrows in with NYX Slim Pencil in Taupe & set with a random eyebrow powder. I used Maybelline Lash Stiletto Liquid Liner in Blackest Black on my eyelid. I took a little MAC Fix+ and mixed it with Humid on my lower lash line. I finished with Maybelline Turbo Volume Mascara in Blackest Black.
I used MAC Studio Fix Foundation Plus in NC30, MAC Studio Finish Concealer in NC20 & MAC Pink Swoon for my blush.
 For my hair, I used Bedhead Wave Artist Iron. I took 2" sections and used the waver about 3" from my scalp, I feel like this gives more of a beach wave look. I run my fingers through each section & spray with a light hold hairspray. 
I used MAC Angel lipstick on my lips. I adore this color, it's almost the exact color of my lips but adds a warmer pink tone. A must have in my opinion. 
So that's today's look., I hope you have a great day!
*Krystle

Thursday, May 9, 2013

BFTE Cosmetics in Double Chocolate, Wizard's Wand & Guilty Pleasures Swatches (and Dupes!)

Happy Thursday!
This is the last set of BFTE Cosmetics swatches that I have to post about, are you sick of these posts yet!?
The last 3 are browns & they are Double Chocolate, Wizards Wand & Guilty Pleasures.
As with the previous posts, I have swatched each color dry & then foiled them with BFTE's Mix & Seal. I have also included the descriptions directly from BFTE's website (if available). If the descriptions were not posted on their website, I will try my best to describe the color.
Double Chocolate (no description available) - Rich chocolate brown with shimmer.
Wizards Wand - Dirty charcoal brown with golden iridescence.
Guilty (spelled Gulity on BFTE's website) Pleasures (no description available)- Golden Brown with multi colored sparkles.
I love browns & neutrals from all companies & these colors do not dissapoint. Double Chocolate is rich & super pigmented. I love it foiled & I am certain I will use this often. Wizards Wand is another color I love, I like it dry or foiled. It has just enough sparkle with out making it look childish, and the color is very complex. Guilty Pleasures is really nice too. I don't really know where I would wear this because the multi colored sparkles are pretty noticeable. 
I found a dupe for Double Chocolate, it's Glamour Doll Eyes (GDE) Chocoholic.
You can see how close they look in the jars..
How close are these two colors!? Chocoholic goes on a little darker dry, Double Chocolate looks a little chalky in the picture, but I assure you it's not! They are really close foiled, Double Chocolate is a little darker & less golden.
Guilty Pleasures also has a dupe. Silly me forgot to take a picture of the bottom of the jars but it is Fyrinnae Shenanigans (left) & Guilty Pleasures (right).
These two are very close in the jars but not so much when swatched.  Shenanigans is more bronze & the multi colored sparkles show up better when dry. Guilty Pleasures is much more brown, it's not as pigmented when applied dry  , but it is much more vibrant when foiled. They look so different when foiled! 
So that's the last of the BFTE swatches & dupes.
Have a great day! 
*Krystle

Tuesday, May 7, 2013

BFTE Cosmetics in Whisper, Brimstone & Moonwalk Swatches (and Dupes!)

Hi, my lovely followers. I hope you are enjoying your Tuesday! 
I've been quite busy, my husband started a new job working 6AM-6PM Monday - Friday so I have been getting up in the morning to go to the gym. I am NOT a morning person, however, I do enjoy walking/jogging to the gym (it's about 1/4 of a mile from our place). I haven't been eating as well as I should be but I have been working out 3-5 days each week. I'll do another health post in the near future.
I have this post & 1 more to finish up the swatches of the new shadows I received from BFTE.
I have swatched each color dry first & then swatched them using BFTE's Mix & Seal. I have included BFTE's descriptions from their website for each swatch also (if available.)
Whisper - Sheer, palest beige with strong blue-violet sheen.
Brimstone (no description available) - Shimmery taupe with slight pinkish undertone.
Moonwalk - Brown/grey pearl.
Of course, these are my favorites of the bunch. I love highlight colors & taupe, especially shimmery ones! Whisper is amazing, it works great for the inner corner of your eye or the brow bone. It's very subtle but the shimmer is blue based, looks gorgeous with purples & blues as a blending color.  Brimstone is one of my favorites, it has this gorgeous cool undertone. It looks more grey to me in person. Moonwalk is such a versatile mocha brown!
I found a dupe for Brimstone & Moonwalk. I tried to match them as closely as possible but it's so hard when the colors are in the jar & dry.
Brimstone's dupe is Fyrinnae Damn Paladins (now it's called Work Safe Blue), Damn Paladins is hands down one of my go to shadows, it's amazing! Brimstone has that same blue shimmer with a taupe base. Brimstone is much lighter & a cooler tone. Both are beautiful!
Moonwalk's dupe is Fyrinnae Witchy Woodland Creatures. They look close in the jar but they are pretty different when swatched. They are very close when dry, although Witchy Woodland Creature's has more glitter & it takes a gold tone when foiled. Moonwalk has a blue shimmer & looks like a darker shade of Damn Paladins. I have to admit that I love Moonwalk & I can't wait to use it!!
Have you tried BFTE or Fyrinnae?
* Krystle

Monday, April 29, 2013

NYX Mega Shine Lip Gloss in Candy Shop & Nude Peach (Swatches & Look)

Hi, my lovely followers!
I signed up for college yesterday! My husband & I start classes on August 12th through a local college & I don't know whether I am excited or nervous. I went to Beauty School right out of high school in 2005-2007 and I haven't been to school since. In all honesty, I am super excited & very happy I waited until I was ready to go to school. We're both going for Business Administration which is 3 years & then I will definitely be continuing on to get my MBA.  So the next 5 years will be very long, filled with working full time & going to school full time. 
Today I will be swatching 2  NYX Mega Shine Lip Glosses in Candy Shop & Nude Peach. I own about 30 of the NYX Mega Shine Lip Glosses. They happen to be one of my must have products! I would love to get around to swatching my whole collection but my life has been crazy lately. 
(Candy Shop & Nude peach)
What NYX's website says:
Kiss me quick! Our signature Mega Shine Lip Gloss delivers shine, moisture and softness and envelops lips with glistening color. The finish is both creamy and steamy and ensures knockout glamour. A blend of mineral and lanolin oils helps protect the pout. Available in 50 almost sinful lip gloss shades.
Candy Shop is a sheer blue pink with gold shimmer. Nude Peach is a shimmery coral (frost). Both come in .37 fl oz with doe foot applicators. The packaging is sleek, clear container that shows the color of the lip gloss with a black top that has a bow printed on the top. They are cruelty free & hypoallergenic. Like all of the other NYX Mega Shine Glosses, they have a light cherry scent. It smells very sweet, thankfully, you can't smell it when it's on your lips. 
I am wearing Candy Shop in the picture above, such a nice pink shade & it can be worn alone or over lipstick. 
Thanks for stopping by!
*Krystle